1815 Quatre Bras inspired Black Powder Napoleonic Wargame (with animation)
Paddy popped down on a wet Saturday afternoon and was allowed in as he brought two lovely bottles of Rioja with him.
Back in the nineties me and my friends at Tyneside Wargames clubs used to play "Empire" rules and amassed truly vast armies over the 25 years or so we played. Then, as often happens to ageing gamers, i drifted away as family and career drew me away.

Now I'm back and after many long years in the box, its time to re-base some of those old armies for Black Powder. The latest to get that treatment are some of my French Guard and British 1815 Campaign toys.
So what to play? I used the Quatre Bras scenario in the second Warlord games supplement as inspiration for a game based on the famous battle for the crossroads. i used the points system to create representative forces for a good bash.
A detailed order of battle can be found at the bottom of this report.
Whoever holds the crossroads at the end of turn eight wins the game. This simulates night falling. To control the crossroads you must have a unit on it with no enemy unit within 6 inches. Effectively meaning you need to take the town at the crossroads to win.
DEPLOYED AT START
2nd British Brigade
4th (Brunswick) Brigade
TURN1
1st French Brigade
2nd French Brigade
3rd French Brigade
1st (Light) French Cavalry Brigade
1st British (Light) Cavalry Brigade
TURN2
3rd British Brigade
2nd (Heavy) French Cavalry Brigade
TURN3
1st French Guard Cavalry Brigade
TURN5
1st Old Guard Brigade
TURN6
2nd British (Heavy) Cavalry Brigade
TURN7
1st British Guards Brigade


Order of battle
1st British Guards Brigade
2 Large British Guards Bns
2nd British Brigade
1 Light Infantry Bn
1 Highland Bn
2 Line Bns
Rifle Coy.
1 Battery Royal Artillery
3rd British Brigade
4 Line Bns
Rifle Coy.
4th (Brunswick) Brigade
Guard Bn
Line Bn
Light Bn
Advanced Guard Bn (village garrison)
Hussar regiment
Foot Bty.
1st British (Light) Cavalry Brigade
KGL hussars
KGL Light Dragoons
1 battery RHA
2nd British (Heavy) Cavalry Brigade
Inniskilling Dragoons
Scots Greys


1st French Brigade
5 Line Bns
1 foot Bty
2nd French Brigade
5 Line Bns
3rd French Brigade
5 Line Bns
1st (Light) French Cavalry Brigade
Lancer Regt.
Chasseur regt.
1 Horse Bty
2nd (Heavy) French Cavalry Brigade
Carabinier Regt
Cuirassier Regt.
1st Old Guard Brigade
Old Guard Grenadier Large Bn
Old Guard Chasseur Large Bn
1 Foot Bty
1st French Guard Cavalry Brigade
Combined Dutch/Polish Guard Regt. (Large)
1 OG Volante Bty
Back in the nineties me and my friends at Tyneside Wargames clubs used to play "Empire" rules and amassed truly vast armies over the 25 years or so we played. Then, as often happens to ageing gamers, i drifted away as family and career drew me away.

Now I'm back and after many long years in the box, its time to re-base some of those old armies for Black Powder. The latest to get that treatment are some of my French Guard and British 1815 Campaign toys.
So what to play? I used the Quatre Bras scenario in the second Warlord games supplement as inspiration for a game based on the famous battle for the crossroads. i used the points system to create representative forces for a good bash.
A detailed order of battle can be found at the bottom of this report.
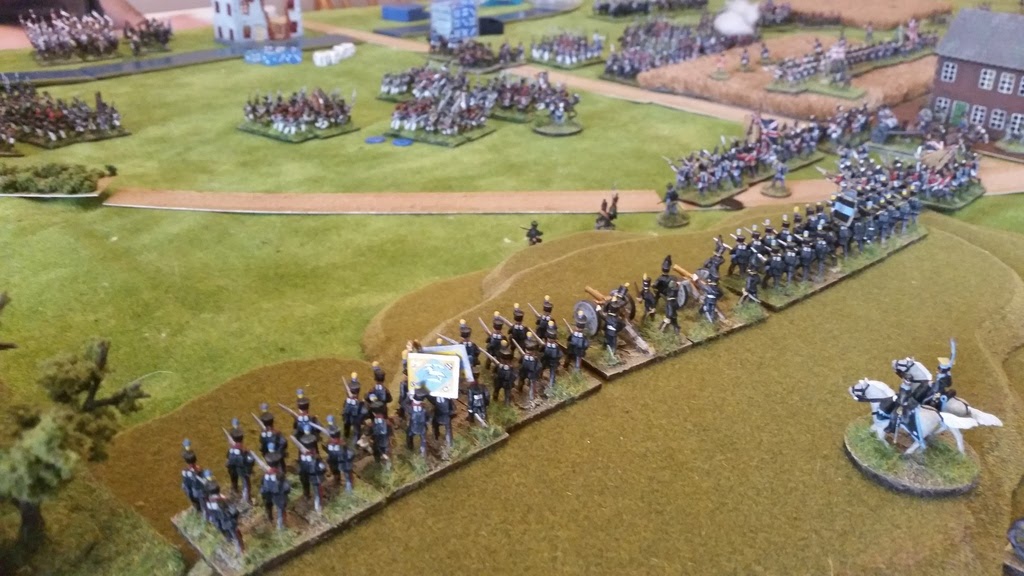
 |
| Re-based and ready for action- the French force. |
 |
| Map. British will be on the bottom edge, French the top. |
SCENARIO
Whoever holds the crossroads at the end of turn eight wins the game. This simulates night falling. To control the crossroads you must have a unit on it with no enemy unit within 6 inches. Effectively meaning you need to take the town at the crossroads to win.
DEPLOYMENT & REINFORCEMENTS
DEPLOYED AT START
2nd British Brigade
4th (Brunswick) Brigade
TURN1
1st French Brigade
2nd French Brigade
3rd French Brigade
1st (Light) French Cavalry Brigade
1st British (Light) Cavalry Brigade
TURN2
3rd British Brigade
2nd (Heavy) French Cavalry Brigade
TURN3
1st French Guard Cavalry Brigade
TURN5
1st Old Guard Brigade
TURN6
2nd British (Heavy) Cavalry Brigade
TURN7
1st British Guards Brigade
Animation of the Battle (SPOILERS!)
 |
| TURN1 |
 |
| 1ST BRIGADE PUSHES FORWARD. |

 |
| LUCKY HITS ON THE FRENCH LIMBERED GUNS BY THE BRITISH ARTY. |

 |
| FRENCH 2ND BRIGADE IN THE CENTRE BLUNDERS AND REVERSES ITS STEPS, PERHAPS WORRIED BY THOSE GUNS? |
 |
| 3RD BRIGADE HURLS ABUSE AT ITS RIVALS AS THEY OVERTAKE THEM AT THE PAS DE CHARGE. |

 |
| BRITISH TURN, THE LINE HOLDS FIRE IN FRONT OF THE VILLAGE NOT WANTING TO WASTE ITS FAMOUS FIRST VOLLEY. REINFORCEMENTS ARRIVE IN THE CENTRE AND THE CAVALRY FACE OFF ON THE RIGHT. |

 |
| TURN3. CAVALRY MANEUVER ON THE RIGHT AND SKIRMISHERS FIRE IN THE CENTRE. |
 |
| British reinforcements arriving, here we see the 2nd Line brigade and the Guards hampered by the immobile Brunswick cavalry which stubbornly refused to move. |

 |
| FRENCH GUARD LANCERS APPEAR IN THE DISTANCE. |
 |
| TURN4. THE FRENCH SECOND BRIGADE IN THE CENTRE PULL THEMSELVES TOGETHER AND CHARGE AGAINST THE BRITISH LIGHT BN. |
 |
| AND ON THE LEFT THE 3RD BRIGADE STORM THROUGH A HAIL OF FIRE UPHILL TOWARDS THE BLACK LINE OF THE BRUNSWICKERS WHO DESPITE THEIR INEXPERIENCE, FORCE THE FRENCH BACK WITH SERIOUS LOSSES, ONE FRENCH UNIT BREAKS AND RUNS. THE SHAME!. |
 |
| SEE THE BRITISH RIFLES IN THE WOODS? NEITHER DID I! I HAD A COMPANY IN THE WOODS ON EACH FLANK - SO WELL CAMOUFLAGED THAT I FORGOT ABOUT THEM FOR THE WHOLE GAME! |
 |
| ON THE RIGHT, LANCERS VS KGL HUSSARS, WITH HORSE ARTILLERY CHIPPING IN. |
 |
| FEROCIOUS FIRE HALTS THE FRENCH IN THE CENTRE, CAUSING CHAOS IN THE FRENCH 2ND BRIGADE. |
 |
| IN THE CORNFIELD, THE FRENCH 1ST BRIGADE LEARNS THE SAME LESSON BUT INFLICT SERIOUS CASUALTIES ON THE SCOTS BEFORE BEING FORCED BACK TO REGROUP. |
 |
| TURN5. AS FRENCH 1ST BRIGADE RECOILS, PADDY UNLEASHES THE GUARD LANCERS AND THE CARABINIERS AT THE BRITISH IN THE CORNFIELD. ITS A BEAUTIFULLY TIMED ATTACK THAT APPROACHED THROUGH THE CHAOS; SEEING THE DANGER, WELLINGTON DASHES FORWARD AS HIS TROOPS FORM SQUARES. NEARBY HE SEES HIS FOOT ARTILLERY BAYONETED TO THEIR GUNS AS THE FRENCH 2ND BRIGADE PUNCHES FORWARD AGAIN. THE BRITISH LIGHT INFANTRY HAVE HAD ENOUGH AND TAKE TO THEIR HEELS. |
 |
| TURN6. FRENCH 3RD BRIGADE SURGES FORWARD AGAIN AS THE BRUNSWICKERS REFUSE TO BUDGE. |
 |
| THROUGH THE SMOKE APPEARS A FEARSOME SIGHT. |
 |
| PADDY PUSHES THE OLD GUARD FORWARD AS SOON AS IT ARRIVES. THE WAY TO THE TOWN IS BLOCKED SO THEY MOVE TO TAKE THE HILL. |
 |
| IN THE CENTRE THE LANCERS MANAGED TO ROUT THE SCOTTISH SQUARE - EVEN WELLINGTON COULDN'T SAVE THEM AND THEY FLED FROM THE FIELD TOGETHER. THE BRUNSWICKERS IN THE TOWN MANAGE TO REPEL FRENCH BAYONET CHARGES. |
 |
| THE OTHER SQUARES NOW FALL VICTIM TO FRENCH INFANTRY AS PADDY TEACHES ME A LESSON IN COMBINED ARMS. THE BRITISH 2ND BRIGADE ROUTS. ON THE RIGHT THE CAVALRY SPARRING CONTINUES. |
 |
| TURN 7. THE FRENCH ATTACK ALL ALONG THE LINE. FRENCH 3RD BRIGADE IS AGAIN DRIVEN OFF BY THE BRUNSWICKERS. |
 |
| THE BRITISH TRY TO COUNTER ATTACK IN THE CENTER BUT ARE FLUNG BACK. THE TOWN GARRISON IS REPLACED WITH FRESH TROOPS, AS ANOTHER FRENCH ATTEMPT IS MADE TO TAKE IT. |
 |
| THE HEROIC BRUNSWICKERS VOLLEY FIRE TO TRY TO STOP THE OLD GUARD. |
 |
| HUGE CASUALTIES DISORDER THE FRENCH RANKS... |
 |
| BUT BRUNSWICK MORALE BREAKS FIRST . |
 |
| THE BRUNSWICK CAVALRY FINALLY DECIDE TO MOVE AND FORCE THE GUARD INTO SQUARE ONLY TO BE ROUTED. THE OLD GUARD CHASSEURS FORCE THE GUNS TO FLEE AS THE VALIANT BRUNSWICK BRIGADE BECOMES SHAKEN. |
 |
| FRENCH 1ST BRIGADE ENGAGES ITS SECOND BRITISH LINE OF THE DAY. |
 |
| CUIRASSIERS CUT THE KGL LIGHT DRAGOONS TO RIBBONS AS THE FRENCH WIN THE CAVALRY BATTLE AT LAST. |
 |
| TURN8. BATTERED BUT VICTORIOUS, THE FRENCH HOLD THE HILL..BUT WHAT OF THE TOWN? |
 |
| AND THATS WHERE IT HAD TO END AS TIME WAS UP. TECHNICALLY THE BRITISH HELD THE CROSSROADS BUT MY ARMY WAS SPENT. ALL I HAD LEFT IN ANY FIT STATE WAS MY RESERVE OF GUARDS WHICH WOULD HAVE BEEN QUICKLY SURROUNDED. PLUS THE FACT WELLINGTON WAS CARRIED OFF MEANT IT WAS GAME OVER - I THINK WE'LL SLIP AWAY UNDER COVER OF DARKNESS AND CALL IT A FRENCH WIN ! (JUST DON'T TELL PADDY). IF YOU PLAN TO USE THIS RE-FIGHT, WE RECOMMEND GIVING THE FRENCH ONE MORE TURN TO MAKE IT END ON TURN9. DISTANCE FROM THEIR TABLE EDGE IS CRUCIAL HERE, OTHERWISE ITS A GREAT GAME. |
Order of battle
Allies - CinC Wellington
1st British Guards Brigade
2 Large British Guards Bns
2nd British Brigade
1 Light Infantry Bn
1 Highland Bn
2 Line Bns
Rifle Coy.
1 Battery Royal Artillery
3rd British Brigade
4 Line Bns
Rifle Coy.
4th (Brunswick) Brigade
Guard Bn
Line Bn
Light Bn
Advanced Guard Bn (village garrison)
Hussar regiment
Foot Bty.
1st British (Light) Cavalry Brigade
KGL hussars
KGL Light Dragoons
1 battery RHA
2nd British (Heavy) Cavalry Brigade
Inniskilling Dragoons
Scots Greys


FRENCH ARMY - CinC Marshal Ney.
1st French Brigade
5 Line Bns
1 foot Bty
2nd French Brigade
5 Line Bns
3rd French Brigade
5 Line Bns
1st (Light) French Cavalry Brigade
Lancer Regt.
Chasseur regt.
1 Horse Bty
2nd (Heavy) French Cavalry Brigade
Carabinier Regt
Cuirassier Regt.
1st Old Guard Brigade
Old Guard Grenadier Large Bn
Old Guard Chasseur Large Bn
1 Foot Bty
1st French Guard Cavalry Brigade
Combined Dutch/Polish Guard Regt. (Large)
1 OG Volante Bty


Thanks Neil, it was a close one !
ReplyDeleteThis comment has been removed by the author.
ReplyDeleteSuperb review and awesome armies!
ReplyDeleteThanks Stefan. .They were painted in the days when I could see better !
DeleteLooks great, can I ask what command ratings you gave and your table size?
ReplyDeleteLove seeing the animation! Can't believe more battle reports don't do this--it gives so much context to the photographs. Thanks for posting!
ReplyDeleteYou are most welcome, thank you! The animations take a long time (especially when learning the program) so that is why i suspect few AAR have them, for mine anyway.
Delete